
Welcome to the community!
This guide will help you get everything you need to create lifelike synthetic voices. We'll walk through selecting a voice, generating and organizing clips, and pronunciation best practices. So, let's dive in and start creating!
In this guide:
Starting a Project
What is a Project?
Projects act as folders to organize your clips easily. To start a new project, click New Project on the top right of Studio. Name your project, select a project model, and start creating.
View the Voice Library
To view the Voice Library anytime, click the Voice's image in Studio or select See All Avatars from the right-hand menu. The Voice Library has a search filter to narrow results based on regional accents, voice characteristics, and performance styles. You can also browse voices in the Voices tab in the left-hand menu.
Choosing the best voice for your use case
- Start by considering the tone and mood you want your production to have. Do you want someone trustworthy, authoritative, focused, or warm?
- Narrow down your search by using the Voice Library filters.
-
Listen to a few different voices and choose your top options.
TIP: Try favoriting your top three choices by clicking on the vertical ellipses (⋮ icon) to the right of each voice to refer back to quickly.
- Give your top three choices a brief audition by copying in a portion of your script—an excerpt that reflects the tone you're aiming for—and create clips for each of your top voices.
If you find a voice you love creating with, add it to your favorites.
Generating Audio Clips
Entering your text
Enter your script by copying it from your source material and pasting it into the Studio Editor.
Available rendering options
Studio offers three rendering options to help streamline your workflow:
- Single take: With this option, you can render a clip of up to 5,000 characters in one take.
- Render by sentence: Use this option to create a new clip for each sentence in your script. This can speed up your workflow by breaking your script into smaller, more manageable pieces.
- Render by paragraph: This option creates a new clip for each paragraph in your script. Use two line breaks to define a new paragraph.
Creating a clip
- Select your voice from the Voice Library.
- Enter your script into the text editor.
- Click Create. You've just made a clip!
How to listen, repopulate, download, and delete a clip
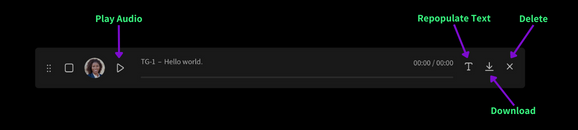
Listen to a clip
- Locate the clip you want to listen to and click the play button on the left of the clip.
- You can pause or resume playback by clicking the play/pause button.
Repopulate a clip
- Locate the clip you want to repopulate and select the "T" icon. The clip's text will pop back into the text editor, and you can make changes.
- Once you've made the desired changes, click the Create button to make a new clip with the updated text.
Download a clip
- Locate the clip and click the download icon.
- Select the desired file format (MP3, OGG, WAV, SRT, VTT, TXT).
- Your clip will download based on your internet browser's download settings.
Delete a clip
- Locate the clip and click the "X" icon.
- The clip will be permanently deleted, and your download credits will be freed up for use on new clips.
Organizing Clips
Renaming a clip
- In your Studio project, click on the title of your selected clip.
- Enter a new name for your clip.
- Click anywhere outside the text file to save.
Combining clips
Merge multiple clips into one using our Combine tool.
- Select the checkbox on the left side of each clip you want to combine. Clips will combine in order from bottom to top.
- Select Combine.
- Name your new clip and select the pause length between each clip.
- Click Create Clip.
Moving a clip
You can rearrange clips within a project and from project to project. Learn how to move files to another project here.
Deleting unwanted clips
In Studio, you can create as many takes as needed to get the right clip. Once you've got the perfect clip, delete unwanted clips to free up your clip usage and streamline your workflow.
A +1 icon indicates that deleting this clip will give you credit back to your account.
Note: Learn more about Unlimited Retakes and how clips are counted.
Pronunciation Best Practices
When the voice needs help predicting a word or text, you can provide it with a replacement spelling to get the correct pronunciation. You can also store your replacements to take advantage of reusing them over and over again.
Use a Respelling Suggestion
Use the Respelling suggestions feature to add accurate Respelling replacements for common, industry-specific, uncommon, and complex words, among others you'd find in the Oxford dictionary. Simply click the open book icon when adding a new replacement in Studio.
Create a phonetic Respelling
Respellings are a unique way to format a word by breaking down each syllable and which syllables should be emphasized.
Create your own Replacement text
Use a Replacement to substitute a word, term, or phrase with an alternative way of spelling when the pronunciation of a word, term, or phrase is otherwise ambiguous.
Example: 1099-MISC, tax form
- Voices will vocalize as “ten ninety-nine M I S C”
- Add a Replacement so the voices will always say “ten ninety-nine Miscellaneous”
Emphasizing a word or phrase
When you place a word or phrase in quotation marks (""), the AI pays particular attention to the chosen word or phrase. Quotation marks let you shape the emphasis of your sentence.

Acronym Pronunciation
Some acronyms are pronounced as a word (NASA), while others aren't (NBA). Learn how to guide the voice when pronouncing acronyms correctly here.
Number Pronunciation
Just like real voice actors, AI voices need cues to understand if a number is a dollar amount, a reference number, a value, an address, a dollar amount, a year, a phone number, and so on. Learn how to pronounce numbers here.
Adding a pause
Adding natural pauses can be added by using commas and periods.
- Commas add pauses anywhere you want a slight, subtle pause.
- Periods create a pause for a downward inflection. They are best used to break a long sentence into two pieces, allowing the AI to better predict which words to emphasize.
Adding a longer pause between sentences
- Use an ellipse (...) to create "breathing room" or a combination of punctuation marks ("...") to create space.
- Press the return or enter key and enter a period a few times for a slightly longer pause.
- You can utilize the Combine feature and choose the length of time between each audio file.
Adjusting questions
Adding inflection to a question requires context, which our AI is still learning. However, you can guide spoken questions to have the inflection you're looking for by using our tips here.
Congratulations, you're now ready to dive into Studio and start bringing your projects to life!
- If you have more questions, check out our Help Center for more information and FAQs.
- Want to see Studio in action? View our latest Creative Session to make the most out of your Studio time.
- If you'd like further assistance, our WellSaid Support team is available to collaborate with.
Happy Creating!